How to Delete Gmail Attachments Without Deleting the Emails
Efficiently recover Google storage by deleting or downsizing Gmail attachments.
When you create a Google account, you also get some free online cloud storage. Cloud storage is a place for reliably and securely storing documents, images, videos, and any other files. You can access these files from anywhere. Each Google account comes with 15 GB of free storage, which is enough to store about 15 hours of high-quality video or several thousand high-quality images. This storage is shared among all of the Google apps you use, including Google Drive, Google Photos and Gmail.
If you store large files in your Google Drive (often these are videos, application backups, zip files, miscellaneous binary files), backup your phone’s images and videos to your Google Photos, or often send or receive emails with large attachments, the available space in your Google storage can fill up quickly.
When Google Photos started, the photos and videos backed up using the “Storage Saver Quality” (previously referred to as “High Quality”) didn’t use up any of your Google storage. Since June 1, 2021, backing up photos and videos in any quality from your devices to Google Photos uses your Google storage — you can read more about this in Google’s announcement.
In this blog post, we will first list the various basic options for recovering your Google storage, and then we will walk you through a few simple steps for how you can delete email attachments while leaving your emails intact.
Basic options for recovering your storage
Once you start running out of storage on your Google account, you will begin seeing notifications such as “You've used 93% of your storage. You need storage to upload files, save photos, and send and receive email.” To check how much storage you have left, you can open the Google One overview page. There, you will see a breakdown across all of the Google apps that you’re using.
While you can purchase more storage, there are several basic options available for you to recover some of your existing Google storage space:
In Google Drive, you can click on “Storage” at the bottom left, which will open the Drive Quota page. This page lists the largest files in your Google Drive, which you can permanently delete to free up your Google storage.
In Google Photos, you can go to the Quota Management page, and delete large or blurry photos and videos, or convert Original Quality photos and videos to Storage Saver Quality.
In Gmail, you can use a search query such as “has:attachment larger:10M” (which will find all emails that have attachments and are larger than 10 MB), and then permanently delete the emails found to recover some space. However, don't rush to delete your emails yet — in the sections below, we will show you a way to delete or downsize email attachments, an approach that recovers most of the storage space used.
Delete email attachments but keep the emails
Rather than deleting whole emails, you can remove Gmail attachments without deleting the emails themselves. This way, you keep the valuable information within the emails (the text) while freeing up your Google storage. You can even back up the email attachments before removing them from the emails.
Gmail doesn’t have this functionality. Fortunately, we've created a web app called Unattach that solves this use case. It relies on Gmail’s official APIs to provide its features and has been verified by Google, which means that all its communication is secure and your private data stays private — you can read more about this topic in its plainly-written privacy policy.
We created a test email, which contains a picture of Mona Lisa. In Gmail’s web interface, the email looks like this:
As we can see above, the picture is an inline attachment (sometimes also referred to as an embedded attachment), which means that the image is displayed as a part of the body of the email. The image we used is a JPEG file named “mona-lisa.jpg” with a size of 1.3 MB.
We now go to https://unattach.com/ and press “Get Started”. Here, we sign in to Unattach with the Google account of which emails we want to update. Once signed in, we press the “Sign in to Gmail” button — this gives the app permissions to update our emails. (This permission can be revoked at any point in your Google account’s permissions.)
Once signed in, Unattach displays two ways of finding emails. The first is Basic Search, which simply returns emails larger than X MB, where X is 0, 1, 2, 3, 5, 10, 25 or 50. This is convenient, since it lets us quickly find all large emails. Note that Gmail allows emails to contain at most 25 MB of attachments.
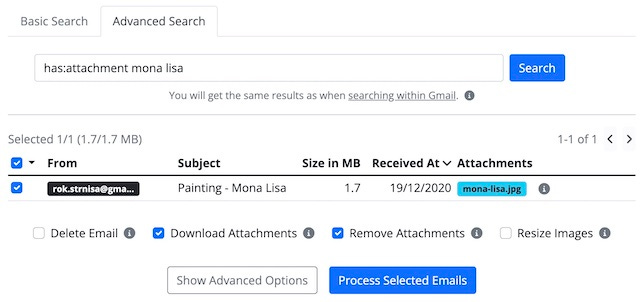
There is also Advanced Search, which allows us to enter any valid Gmail query. Gmail query is the text you normally enter in the search field of Gmail’s web interface. See the search operators you can use in Gmail. Unattach will show exactly the same results as Gmail's web interface for the same query.
We enter the search query “has:attachment subject:"mona lisa painting"” to locate our test email. We then select the email (by ticking the box to the left of it), and enable the “Remove Attachments” option.
When we press “Process Selected Emails”, the app downloads the email’s attachments into the Downloads directory, and deletes the email’s attachment. The email’s labels and “Received Date” are preserved, which means that the updated email appears in exactly the same places as before.
From a technical point of view, the app deletes the attachment by inserting a new email (the one without the attachment) into your Gmail, and then deleting the original email (the one with the attachments). We’ll talk more about the latter part in a moment.
Unattach shows that the email’s attachment has been removed:
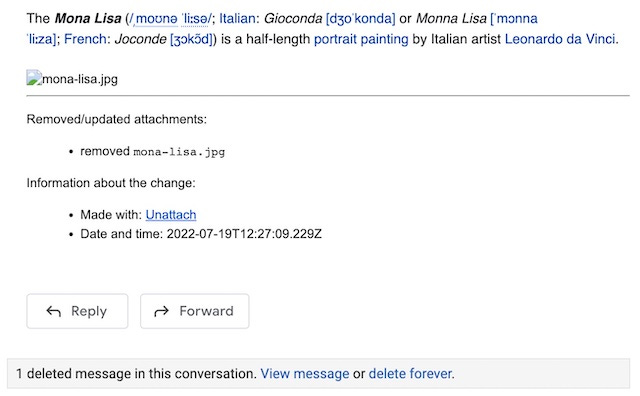
If we now view the email again in Gmail’s web interface (we can open the email by clicking on its Subject within Unattach), we can confirm that the attachment has been removed:
As we can see from the above screenshot, Unattach also added information about the change. This is optional and can be disabled in the app’s advanced options.
In addition, we can see the message “1 deleted message in this conversation. View message or delete forever.” at the bottom. By default, Unattach puts the original email (the one with attachments) into Gmail’s Bin. This allows us to easily undo any action taken by the app.
As long as the original email is in the Bin, no Google storage will have been freed. Gmail will automatically permanently-delete the original email after it has been in the Bin for 30 days. We can also manually empty the Bin, which will immediately free up the Google storage.
If we don’t want to wait 30 days or manually empty the Bin, we can tell Unattach to permanently-delete the original email instead of putting it in the Bin. This can be configured in the app’s advanced options.
Downsize image attachments
The Unattach app also supports downsizing image attachments. If we tell Unattach to downsize rather than delete the attachment in the above Mona Lisa email, it will show that it has reduced the email size by 90%. This is because it reduced the resolution and quality of the attached JPEG image, which in turn reduced its size from 1.3 MB to 129 KB.
In this case, Unattach shows that the email attachment has been downsized:
If we now view the email in Gmail’s web viewer, it looks the same as the original, except that the image quality is lower:
This approach allows us to substantially reduce the size of emails with image attachments. We can also configure the target resolution and quality of the images. Most of the popular image extensions are supported: apng, avif, bmp, gif, jfif, jpg, jpeg, pjp, pjpeg, png, and webp.
Conclusion
In this blog post, we have shown how Unattach can be used to remove or downsize attachments while leaving the email intact. The same app can be used to process many emails at once, and remove duplicate attachments from Gmail threads, allowing you to easily recover a substantial amount of your Google storage.
Give Unattach a try for free!


